

 6371
6371
Summary
Merchants running a shop using WordPress with WooCommerce can process payments through SegPay. Just follow the instructions below to install the SegPay plugin.
 OpenSourcePlatform: WooCommerce
Prerequisites: Wordpress, WooCommerce Plugin
Pre-Installation Checklist
Complete the following steps before installing the plugin:
1. Create a Segpay account, if you do not have one already: http://segpay.com
2. Ask your Segpay Account Rep to do the following:
a. Set up dynamic pricing for your account. As part of that process, you will be approved for a maximum purchase amount that can be submitted from your cart.
b. Send you the plugin installation zip file for Woocommerce. Save the file to a folder on your computer.
c. Create a Username and Access Key for SegPay Reporting Services (SRS).
3. Check our Merchant Setup documentation at: http://support.segpay.com/kb/article/16-merchant-setup-overview for help setting up packages and postbacks, and generating an EticketId. Feel free to reach out to your SegPay rep for help with this, as well.
4. Login to the SegPay Merchant Portal to set up a Transaction Postback (Trans post).
a. Enter the following in the URL field: (Populate YOUR_SITE_URL with the actual domain where this request will go).
YOUR_SITE_URL?segpay_notify=1&action=<action>&approved=<approved>&trantype=<trantype>&purchaseid=<purchaseid>&tranid=<tranid>&price=<price>¤cycode=<currencycode>&eticketid=<eticketid>&ip=<ipaddress>&desc=<desc>&name=<billname>&firstname=<billnamefirst>&lastname=<billnamelast>&email=<billemail>&phone=<billphone>&address=<billaddr>&city=<billcity>&state=<billstate>&zipcode=<billzip>&country=<billcntry>&billertranstime=<transtime>&invoiceid=<extra invoiceid>
b. Enter “OK” in the Expected Response field for the Transaction Postback.
Plugin Installation
1. Login to Wordpress and go to: Admin à Plugins à Add New. Click Upload Plugin (see image below) then click Choose File and select the zip file that your SegPay rep sent to you.

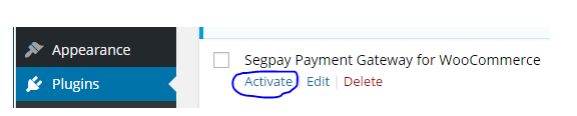
2. Click Install Now. Once the plugin is installed, go to Plugins à Installed Plugins (if you are not redirected there automatically) and activate the SegPay Gateway for WooCommerce (see image below).
3. Go to WooCommerce à Settings and select the Checkout tab along the top of the page.
4. Next to Checkout Options, click Segpay.

5. Select the checkbox next to Enable SegPay Payment Module. Click Save Changes at the bottom of the page.

6. The following fields are displayed:
- Title: SegPay (pre-populated)

- Description: Pay securely by Credit or Debit Card through Segpay Secure Servers. (pre-populated)

- eTicket ID: Enter your custom eTicketID, in the format XXXXXX:YYYY. From Pre-Installation step 3 above.

- Username/Password: Enter your SRS Username and Access Key. From Pre-Installation step 2c above.

- Live Payment URL: https://secure4.segpay.com/billing/poset.cgi (pre-populated).

- Price Hash URL:http://srs.segpay.com/PricingHash/PricingHash.svc/GetDynamicTrans (pre-populated).

- Refund URL:http://srs.segpay.com/ADM.asmx/RefundTransaction (pre-populated).

- Authorized Text: Transaction Successful (pre-populated).

- Declined Text: Transaction Failed (pre-populated).

7. Click Save Changes at the bottom of the page.
Testing
You’re ready to take payments, however your account is initially in Test Mode, meaning no actual charges are processed yet. Follow the steps below to run a payment in Test Mode before we set your account to Live:
1. Place an order in your shop, proceed to checkout, enter billing info and select SegPay. Click Place Order.

2. On the SegPay Payment page, enter your card details and click Complete This Secure Purchase.
3. You will see a Success page, confirming your test payment went through, and then redirected back to your shop’s website. If you are not taken back to your shop automatically, click Transaction Successful. Note that you can customize this message. Go to WooCommerce à Settings and look for the Authorized Text field (see step 6 in previous section).
4. Go back to the WordPress Admin area and click WooCommerce à Orders. You will see the test order listed. Click to view it.
5. Click Refund to test that you can refund a payment (see image below). Then click Refund via SegPay.

Go Live
After testing, please contact SegPay Technical Support ([email protected]) to have your account set to Live mode. A technical integration specialist will run an additional end-to-end test to ensure everything is working properly, and let you know when you’re ready to start taking payments.

