
 10463
10463
Introduction
Once you’ve created your price point(s), website(s), postback configuration(s), payment page template(s), etc., you can combine them together into a package, which is used to create the Join link(s) that take consumers to your payment page with all the correct information to check out. The Segpay Merchant portal makes it easy to add and manage packages. First login to the portal at: https://mp.segpay.com, then point your mouse at the My Websites menu and select Manage Packages.
Add Packages
To add a new package, just click Add Package and follow these steps:
1.Select the merchant associated with this package (assuming you have more than one merchant account). Notice the search box, which comes in handy if you have a long list of merchants to scroll through.

Package Tab
You’ll start on the Package tab, where you can enter the following:

2. Select Package Status: This is the status of your package within Segpay’s compliance review process. This field defaults to Approved, and is only changed by Segpay.

Other package statuses include:
Pending Compliance: Package is being reviewed by Segpay’s Compliance team.
Approved Non CC Only
Rebills Only
Closed
3. Enter a Package Description: Something to identify the package; e.g., “Monthly Membership.”

4. Select which URL (website) belongs to this package. The URL you select will be displayed under your Merchant selection near the top of the page.

5.Set the Processing Status: This status reflects whether you are processing in test mode or taking live transactions. The statuses available are listed in the dropdown menu (Required field).
Notes:
-
- Always Approve: When initially creating the package, you’ll only be able to select an “always approve” processing status, which puts you in test mode to start. Transactions are not sent to any bank, they are all approved for testing purposes.
- EU merchants can only select EU and direct debit processors.
- US IPSP merchants can only select USIPSP and direct debit processors.
- US direct debit merchants can only select USDirect and direct debit processors.

6. Enable Stand-in: Stand-In processing, turned on by default, triggers when Segpay is unable to communicate with a bank in a credit card transaction. Instead of issuing a decline, Segpay temporarily approves the transaction and then retries it up to three times every two hours. This continues until the bank authorizes or declines the transaction, or the maximum number of retries is exceeded. Stand-in is most useful for small dollar trial subscriptions where the merchant’s cost for providing temporary access is low.

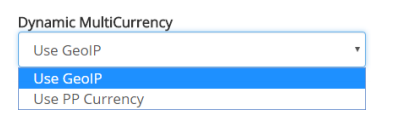
7. Enable Dynamic Multicurrency (DMC). DMC allows Europe-based merchants to display pricing in currencies other than USD, EUR or GBP. To enable DMC, select one of two settings:
-
- Use GeoIP: Prices are displayed in local currency based on the region of the consumer’s IP address.
- Use Price Point Currency: Prices are displayed in the currency you assigned to the price point(s) in this package (see Pricing section below). Consumers can still choose their local currency from a dropdown menu, if they prefer.
Notes:
o Regardless of your selection, you can force the display of any specific currency (see page 16 of Segpay’s Processing API for Merchants).
o If Processing Status (see step 5 above) is set to Direct Debit, DMC is disabled.
8. Select a Postback configuration: Choose one of the postback configurations associated with the selected merchant account. This determines how data is sent back to you after transactions and other events are processed.

9. Save your changes by clicking one of the following:
Save: Save your changes and continue to add Pricing, Cross Sells, Pay Page Templates and Email Templates to the package.
Save and Add Another: Save your changes and reload the “Add package” form so you can begin adding the next one.
Save and Clone: Save your changes and easily create a copy of the package you just created. The “Add package” form will reload, pre-populated with the settings you just saved. Make whatever changes you like before saving.
Cancel: Exit the “Add package” form and discard any data you entered in the fields above.

Pricing Tab
When you save your settings on the Package tab, the Pricing tab will be available.

1. Select a base currency: US Dollars (USD), Euros (EUR) or British Pounds (GBP). Note: if your Processor Status (step 5 under the Package tab, above) is set to Credit Card Reseller, then USD may be the only base currency available. If you attempt to change the base currency after saving price points (in step 2 below) you will lose those price points and have to start over.

Note: For Direct Debit packages, you won’t select a base currency. Only EUR and GBP price points are available and you’ll select at least one of each before saving the Pricing tab.
2. Select one or more price point(s) to be included in this package. Select the checkbox next to each price point you want to add to the package (or click Select All). All available price points in the currency you selected are displayed in the table (see image below), which displays each price point ID, type, description and whether the price point is one-click enabled (returning consumers can purchase one-click price points without re-entering their credit card info).
Note: If you have Dynamic price points in your list, you can only select one. If you click “Select All,” Dynamic price points will remain unselected.

If you have a large list of price points, you can narrow it down using the filters on the following columns:
- Checkbox: show only price points that you've selected (or not selected).
- One Click Enabled: show only price points that are One Click enabled (or not).
- Type: show only price points of a certain type.
Click Update Pricing in the bottom-right area of the screen to save your selected price point(s) to the package. The saved price points will display at the top of the list, highlighted in green.
You can click Get My Button Code next to any price point saved to the package, to see the URL (Join Link) that takes someone to the payment page with that pricing.
Cross Sell Configuration tab

Under the Cross Sell Configuration tab you can select offers that you want to cross-sell as part of this package, when consumers are on your payment page. Your Segpay rep will let you know ahead of time:
- how many cross sell offers you are approved for
- which specific offers you can select.
- Whether your cross-sell(s) can be pre-checked (consumer opt-outs)
Those settings will be reflected on this page. Note that only offers that match the price point currency, payment type and Multi-currency (DMC) status of the package you are editing will be selectable here.
Select your offer for Cross Sell 1 (and Cross Sell 2, if applicable). Click Save Changes when you are finished.

Pay Page Templates tab

Under the Pay Page Templates tab you can see which versions of the Segpay payment and receipt pages you are using. You will default to our classic look, as in the following image:

If you’re OK with that default design, click the next tab you want to view. Otherwise, please contact [email protected] to learn about the different templates available. When you decide on a template, Segpay will update the Package for you, and you’ll be able to see the change here. By default, your selection will be used for all of your packages that use the same payment method (credit card or direct debit).

Email Templates tab

Emails are automatically sent to your consumers in various scenarios, such as to confirm initial signup, refunds, cancellations, etc. Under the Email Templates tab you can see which email templates are being used for the various messages that go out on your behalf:

As with pay page templates, if you’re OK with the defaults, click the next tab you want to view. Otherwise, please contact [email protected] to learn about the different email templates available to you and have Segpay update one or more of your templates. By default, your selection will be used for all of your packages.
Your Segpay rep can apply your Email and Pay Page Template choices to any specific package(s) or to all of your packages at once.
View all Packages
After you’ve created at least one website, you can see your list of websites anytime by clicking My Websites/Manage Packages.

If you have more than one merchant, select the merchant whose packages you want to see. Click on any column header to sort your list by that column. Click once to sort chronologically, (oldest first) or alphabetically; and then click the header again to re-sort by newest first, or reverse alphabetical.
If you have a long list of packages, you can use the search box near the top of the page. Just enter the first few digits of the package ID until it appears in the table.
If you have more than 25 packages, you will see the first 25 on the page by default. Click the Items per Page menu below the report to increase the results per page to 50, 100 or “All” (to see all packages on one page). If you have more than one page, use the arrows to move back and forth between pages in your list.

Make Changes
As you see in the image above, two links appear to the right of each website in your list:
- Edit: Make changes to any of the options you selected when creating the package (see Add Packages section above).
- Clone: Create a copy of the package. See Save and Clone option in the previous section.
If you ever need help with your packages, or if you have thoughts or suggestions on this or any other Segpay feature, please contact us at [email protected].


